How Do Locks Lock?
When I was 9 or so, I was convinced I could write my own operating system in GW-BASIC. After all, I had written programs that played Mary Had a Little Lamb on the PC speaker while displaying CGA graphics. How much harder could an operating system be?
One thing had me stumped. How would I get my OS to multitask?
After giving it some thought, the best idea I could come up with was to write the programs for my “OS” in such a way that they would occasionally perform a GOSUB or GOTO to parts of other programs. By using a lot of mental handwaving to myself, I was convinced I could somehow make it work.
But the details came back to bite me. I never pulled it off. I put it aside and worked on other things. I just assumed that something magical happened under the covers. My bedtime reading of magazines like PC/Computing convinced me that the magical solution to the problem included buzzwords like “preemptive multitasking” and “multithreading.” Both of these ideas were in the upcoming Windows NT 3.1 design. I didn’t really understand what these buzzwords meant, but at least they sounded impressive.
Even though I’ve learned a bit more about writing programs that can do more than one thing at a time since those early days, I still have points where I don’t understand exactly what is going on. Recently, I decided that I wanted to stop my handwaving about locks and do whatever it took to find out how they, well… lock.
A View from the Top
Locks let you express your belief that something bad might happen if two threads go through a section of code at the same time. Locks are present in many languages. Here’s an example of one in C#:
object syncRoot = new object();

private void MyFunction()
{
 lock (syncRoot)
 {
     // only one thread can enter this locked gate at a time.
 }
}
The above lock creates a “gate” that only allows one thread at a time regardless of what that thread is doing. This is often too pessimistic and inefficient. In a lot of cases, it doesn’t matter if multiple threads are reading a piece of data at the same time. However, we want to make sure that there is only one writer at a time. Furthermore, we want to make sure that the readers don’t see corrupted garbage.
A lock that is optimized for allowing multiple readers at a time while still being consistent in the face of writers is called a reader/writer lock. Here’s an example of some typical code you might see in an application that has to cache objects that take a long time to create:
private readonly Dictionary<string, ReallyExpensiveObject> expensiveObjectCache
 = new Dictionary<string, ReallyExpensiveObject>();

private readonly ReaderWriterLock rwl = new ReaderWriterLock();

public ReallyExpensiveObject GetExpensiveObject(string key)
{
 ReallyExpensiveObject expensiveObject;

 rwl.AcquireReaderLock(Timeout.Infinite);

 try
 {
     if (this.expensiveObjectCache.TryGetValue(key, out expensiveObject))
     {
         // Cache hit
         return expensiveObject;
     }

     // Cache miss
     LockCookie cookie;

     cookie = rwl.UpgradeToWriterLock(Timeout.Infinite);
     try
     {
         expensiveObject = new ReallyExpensiveObject();
         expensiveObjectCache[key] = expensiveObject;
         return expensiveObject;
     }

     finally
     {
         rwl.DowngradeFromWriterLock(ref cookie);
     }
 }
 finally
 {
     rwl.ReleaseReaderLock();
 }
}
This code will allow more than one reader at a time and will handle the case of upgrading the read lock to a write lock if it needs to insert an item into the cache. The code is a bit long and tedious to write. [1] Even worse, it has a very subtle bug in it that we’ll look at later.
We first need to understand what is going on inside a lock. Since reader/writer locks are usually more interesting than a normal lock, we’ll focus on the details of a reader/writer lock implementation. [2]
Entering an Internal Lock
Locks themselves have internal data that they must protect from corruption by competing threads. This internal data includes the number of active readers and how many threads are waiting to write data. In order to provide this protection, locks must enter an internal lock.
For simplicity, locks usually have a single variable that indicates if a thread has acquired the internal lock. I’ll illustrate this and other concepts by posting snippets from Vance Morrison’s excellent reader-writer lock sample: [3]
private void EnterMyLock()
{
   if (Interlocked.CompareExchange(ref myLock, 1, 0) != 0)
      EnterMyLockSpin();
}
In Vance’s code, a member variable named “myLock” is set to 1 if the lock is held, otherwise it is 0. The Interlocked.CompareExchange function is interesting because it does two things. If “myLock” is 0, then it is set to 1. If “myLock” doesn’t equal 0, then we know that someone else has the internal lock. The documentation says that “the compare and exchange operations are performed as an atomic operation.” I was curious how this actually worked, so I looked at .NET’s source code and eventually hit this wall:
[MethodImplAttribute(MethodImplOptions.InternalCall)]
[ReliabilityContract(Consistency.WillNotCorruptState, Cer.Success)]
public static extern int Exchange(ref int location1, int value);
In my earlier .NET days, I would have given up at this point. The “InternalCall” attribute indicates that the CLR handles the call internally. It seemed like I would never quite know what happened inside this mysterious internal call.
Inside an InternalCall
Rotor lets you look at the CLR’s internals that are mostly written in C++ with a small amount of assembly code. [4] If you navigate through several layers of function calls, you’ll see that Interlocked.CompareExchange ultimately reaches this function in clr/src/vm/i386/asmhelpers.asm that is written in x86 assembly: [5]
FASTCALL_FUNC CompareExchangeMP,12
 _ASSERT_ALIGNED_4_X86 ecx
 mov eax, [esp+4]        ; Comparand
 cmpxchg [ecx], edx
 retn 4                  ; result in EAX
FASTCALL_ENDFUNC CompareExchangeMP
By far, the most interesting aspect of this is the “lock cmpxchg” line. Besides giving gamers power to play DOOM, the 486 chip introduced a “cmpxchg” instruction that will both compare a value and exchange it with a new value if the comparison succeeds. It does this in a single CPU instruction. This is how the documentation can claim that it is an “atomic” operation. We’ll see why it’s very important to do this in a single instruction a bit later. The “lock” prefix is used to tell the CPU to assert a physical signal so that no other core can access memory at the same time. [6] This hardware locking is how the “myLock” variable can remain safe from simultaneous access by other cores.
But now what happens if another thread already had the internal lock?
Spinlocks
When locks need to wait on the internal lock, they typically use a spinlock. This tells the processor to essentially spin around in circles in order to waste a little bit of time so that the thread that has the internal lock can possibly finish what it is doing and exit the lock.
Here’s an example from Vance’s code of how a spinlock is performed:
private void EnterMyLockSpin()
{
 for (int i = 0; ;i++)
 {
     if (i < 3 && Environment.ProcessorCount > 1)
         Thread.SpinWait(20); // Wait a few dozen instructions to let another processor release the lock.
     else
         Thread.Sleep(0); // Give up my quantum.

     if (Interlocked.CompareExchange(ref myLock, 1, 0) == 0)
        return;
 }
}
It’s a basic for loop that has a few interesting bits. The first thing to notice is that this loop will keep going until the CompareExchange succeeds. That is, until we acquire the internal lock.
On a multiprocessor system, it will try a Thread.SpinWait for 3 times. The documentation for SpinWait is a bit confusing about what it does with the “20” argument:
SpinWait essentially puts the processor into a very tight loop, with the loop count specified by the iterations parameter. The duration of the wait therefore depends on the speed of the processor.
What exactly is it doing? Looking at Rotor’s clr/src/vm/comsynchronizable.cpp gives us the reality:
FCIMPL1(void, ThreadNative::SpinWait, int iterations)
{
 WRAPPER_CONTRACT;
 STATIC_CONTRACT_SO_TOLERANT;

 for(int i = 0; i < iterations; i++)
     YieldProcessor();
}
FCIMPLEND
Further diving shows that “YieldProcessor” is this macro:
#define YieldProcessor() __asm { rep nop }This is a “repeat no-op” assembly instruction. It’s also known in the Intel instruction set manual as “PAUSE - Spin Loop Hint.” [7] This means that the CPU knows about the spin waiting that we’re wanting to accomplish.
As the documentation hinted, the time spent waiting is dependant upon the clock rate of the machine. In my case, I have an EE6600 Core 2 Duo where each core runs at 2.4 GHz, and it’s about 3.4 nanoseconds for each “YieldProcessor” call. [8] This means it takes approximately 70 nanoseconds for 20 iterations. Three unsuccessful passes through this loop will cost about 210 nanoseconds.
I’m sure that if reader/writer locks had cheerleaders inside of them, they would be shouting in hope that the spin wait used enough time so that the thread that had the internal lock that is protected by the “cmpxchg” will have released it.
Why does the lock try so hard to get by with only a spin wait? In a word: speed.
By not being able to satisfy the request with a spin wait, the thread gives up and goes to sleep. This requires intervention by the OS to potentially swap it out and run a different thread that that has been waiting. By letting another thread run, there is a chance that the CPU will have to toss out its onboard cache only to fetch it back when the thread gets swapped back in. All of this could potentially add up to hundreds of thousands of CPU cycles that aren’t being used to get “real” work done. [9]
How Does a Thread Sleep? How Does it Know When to Wake Up?
Windows keeps track of the state of each thread in your system. [10] Here’s a simplified thread state chart from the excellent Windows Internals book:
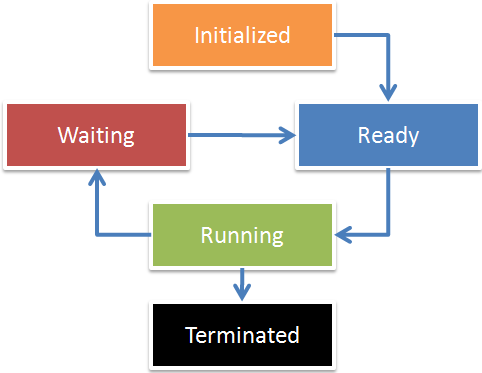
When your thread is “Running” and is interrupted because its time-slice ran out or it voluntarily gave up its time slice by using a Sleep(0) request, the OS will save the state of what it is doing by performing a context switch. The fact that this switch can occur at any time is why it was critical that the CompareExchange code execute in a single CPU instruction that cannot be interrupted. If it didn’t, it would be possible to put the lock in an inconsistent state between the compare and the exchange.
When the Sleep(0) call is made, the thread is put in a “Ready” queue meaning that it’s “ready” to run and not waiting on anything. [11]
While we’re at this chart, it’s important to note that one of the possible thread states is “waiting.” Windows will keep track of the events that a thread is waiting on.
Events are useful for signaling between threads. For example, a reader/writer lock can “signal” other threads by informing the OS that an event has been “set.” What happens next inside of the thread scheduler/dispatcher depends on the type of event that was set: [12]
- AutoResetEvent: In this case, only a single thread that is waiting for the event will be put into the “ready” queue. Anyone else that is waiting for the event stays in the waiting queue. This is useful for releasing exactly one writer.
- ManualResetEvent: When signaled, Windows will update all of the threads that are waiting on the event to be moved into the ready queue. Effectively, it releases them all. This is useful for releasing all waiting readers.
What’s important to realize is that we have the cooperation of the thread dispatcher in the OS to obey the thread states. By simply being in the waiting queue, the threads aren’t even considered to be scheduled to run and thus consume no real CPU time.
Putting It All Together
It’s been a long journey, but we now have all the background information we need in order to understand how a reader/writer lock actually locks:
- Acquiring a Read Lock:
- Enter the internal lock (spin wait or sleep as necessary)
- Look to see If there is anyone writing
- If no one is writing and no writers are waiting, just increase the number of readers. This is the happy path.
- If a writer is writing, tell the OS that we want to wait until the “ready for readers” event is set.
- Exit the internal lock.
- Exiting a read lock:
- Enter the internal lock
- Decrement the total number of readers.
- Check the total number of readers remaining
- If there are still readers remaining, then make sure that all waiting readers have been released so they can run.
- If there are no readers left and there is at least one writer waiting, signal the appropriate event so that exactly one of the waiting writers wakes up and will get the lock.
- Exit the internal lock.
- Acquiring a write lock:
- Enter the internal lock
- Check the number of readers or if there is an active writer in progress. In addition, check to see if there are any in line waiting to do either.
- If there are no readers or writers, record that we’re writing. This is the happy path.
- Otherwise wait for our turn in line on the write queue by waiting on the “ready for writing” event.
- Exit the internal lock
- Exiting a write lock:
- Enter the internal lock
- Check how many readers or writers are waiting
- If there are no waiting writers, immediately signal all readers at once.
- Alternatively, release one writer that has been waiting.
- Exit the internal lock.
As it turned out, the locks themselves are fairly simple. They just had a few pieces that came together in interesting ways.
The Problem of the Upgrades
There’s a subtle problem with reader/writer locks: Imagine that two threads are both in a read lock and then they both decide that they need to upgrade to a write lock. Because a writer must wait for all readers to finish before acquiring a write lock, there seems to be a deadlock scenario since neither one wants to give up its read lock.
The secret trick is that they indeed must give up their read lock if there are any other active readers. This forces a correct implementation to do something like this when performing an upgrade:
// Cache miss
LockCookie cookie;

int writerSeqNum = rwl.WriterSeqNum;

cookie = rwl.UpgradeToWriterLock(Timeout.Infinite);

try
{
    if (rwl.AnyWritersSince(writerSeqNum))
 {
     // Since another writer snuck in, we might no longer need
     // to create a new object. Let's check again to see if we
     // need to do this.

     if (this.expensiveObjectCache.TryGetValue(key, out expensiveObjectCache))
     {
         // The other writer(s) must have created it
         return expensiveObjectCache;
     }
 }

 // Other writers didn't sneak in, so we know we need to create
 // the object.

 expensiveObject = new ReallyExpensiveObject();

 expensiveObjectCache[key] = expensiveObject;

 return expensiveObject;

}
finally
{
 rwl.DowngradeFromWriterLock(ref cookie);
}
Each time a writer lock is acquired, the WriterSeqNum is incremented. The “AnyWritersSince” function will check to see if any writers have occurred since the moment just before we upgraded. If this is true, then it means that another writer might have come in and thus we need to recheck our assumptions.
This is just one way to handle the upgrade problem. [13]
As Joe Duffy explained on his blog, the new ReaderWriterLockSlim gets around the upgrade problem by introducing an “UpgradeableRead.” When a thread enters an upgradeable read, the lock will force all subsequent readers to wait until the thread decides if it wants to upgrade. In the mean time, existing readers are allowed to finish. If an upgrade is requested, the lock will wait until no more readers are present. This preserves the integrity of the data.
Here’s a full example:
private ReaderWriterLockSlim slimLock = new ReaderWriterLockSlim();

public ReallyExpensiveObject GetExpensiveObjectSlim(string key)
{
    ReallyExpensiveObject expensiveObject;

 bool upgraded = true;

 this.slimLock.EnterUpgradeableReadLock();

 try
 {
     if (this.expensiveObjectCache.TryGetValue(key, out expensiveObject))
     {
         // Cache hit
         upgraded = false;
         return expensiveObject;
     }

     // Cache miss
     this.slimLock.EnterWriteLock();

     try
     {
         expensiveObject = new ReallyExpensiveObject();
         expensiveObjectCache[key] = expensiveObject;
         return expensiveObject;
     }
     finally
     {
         this.slimLock.ExitWriteLock();
     }
 }
 finally
 {
     slimLock.ExitUpgradeableReadLock();
 }
}
While showing the full syntax needed, it’s a bad example of using a ReaderWriterLockSlim since it doesn’t allow for multiple readers. The code might perform better by just entering a read lock if reads occur much more frequently than writes. If the a write is actually needed, then a subsequent write lock can be acquired and a double check can occur to see if a write is still needed. Alternatively, a classic Monitor style lock can be used.
Conclusion: Why Should I Care About the Details?
Our journey has taken us from the high level of using a reader/writer lock to the low level of a single signal on the processor bus. Knowing this low level “goo” is helpful for a few reasons:
- Ideally, lock sections should be kept small so that no lock contention occurs in the first place so that we don’t need to “spin wait” at all (to acquire the internal lock).
- Since readers are released all at once via an event, it shows how a reader/writer lock gets its performance benefit over a normal Monitor lock that would force waiting readers to wait in a line to get released one-by-one.
- We now can see that locks aren’t magic at all. They just have a few moving parts.
With a better understanding of locks, I’ll focus my handwaving on other concepts… like building a work-stealing thread pool.
UPDATE 30 Sep 2008: I fixed the footnote links and updated conclusion #1 based off comments.
UPDATE 3 Oct 2008: I updated the paragraph discussing why spin waits can be helpful based off some good discussion in the comments.
Notes
(This article had a few places where I made some claims. I’m sure I probably got some things wrong or might have misunderstood something in my explorations. I’m putting notes here to give background of what I was thinking when I wrote the post. Please feel free to correct me and keep me honest via comments for the benefit of others)
[1] If performance isn’t insanely critical, you can create your own lock and have helper methods like “EnterScopedRead” that return an IDisposable object that will automatically release the lock when it’s disposed. Then, you can use a C# “using” statement with it to reduce some of the code clutter.
[2] I still think that reader/writer locks are more interesting than normal Monitor type locks. However, if you have a relatively balanced number of readers and writers (e.g. no clear readers majority), then Monitors make more sense since they’re slightly faster. However, the code that Monitors uses a lot more assembly code for performance reasons and thus is often harder to understand.
[3] Even a cursory look at the source code of .NET 3.5’s new ReaderWriterLockSlim in Reflector shows that Vance’s lock code was the basis for it. ReaderWriterLockSlim is slightly more complex to handle cases like a recursive lock (e.g. acquiring a read lock when you have a write lock), but the core ideas remain the same.
[4] To be technically correct, Rotor isn’t exactly what the commercial CLR is. Some of the aspects like the garbage collector and the Just In Time (JIT) compiler are different due to trade secrets. However, I don’t think the parts I’ll be mentioning here are different between the reference implementation and the actual commercial implementation. For more details on Rotor, I recommend reading Joel Pobar and Ted Neward’s new book on Rotor 2.0.
[5] Things aren’t quite that simple. The first thing to realize is that the CLR has a Platform Adaptation Layer (PAL) that handles all architecture specific code. Thus, there can be equivalent assembly code for other chips like the PowerPC which is located in clr/src/vm/ppc. Furthermore, the actual x86 code can be one of these two functions:
FASTCALL_FUNC CompareExchangeUP,12
 _ASSERT_ALIGNED_4_X86 ecx
 mov eax, [esp+4]        ; Comparand
 cmpxchg [ecx], edx
 retn 4                  ; result in EAX
FASTCALL_ENDFUNC CompareExchangeUP
or
FASTCALL_FUNC CompareExchangeMP,12
    _ASSERT_ALIGNED_4_X86 ecx
    mov     eax, [esp+4]    ; Comparand
    lock  cmpxchg [ecx], edx
    retn    4               ; result in EAX
FASTCALL_ENDFUNC CompareExchangeMP
If you look at cgenx86.cpp, you’ll see that CompareExchangeUP is the default and the CompareExchangeMP is used if your system has more than one processor:
CmpXchgOps FastInterlockCompareExchange = (CmpXchgOps)CompareExchangeUP;

// Adjust the generic interlocked operations for any platform specific ones we
// might have.

void InitFastInterlockOps()
{
...

  if (g_SystemInfo.dwNumberOfProcessors != 1)
  {
   ...

   FastInterlockCompareExchange = (CmpXchgOps)CompareExchangeMP;

   ...
  }

...
}
From this, I was able to determine that “CompareExchangeUP” is for uniprocessor machines and “CompareExchangeMP” is for multiprocessor machines. If you look at the code carefully, you’ll notice that the only difference is that the uniprocessor version doesn’t bother locking the processor bus. This is safe because there is no chance of simultaneous memory access.
[6] The truth is a little bit more complicated, but more interesting. The Intel 64 and IA-32 Architectures Software Developer’s Manual - Volume 3A: System Programming Guide, Part 1 tells us:
7.1.4 Effects of a LOCK Operation on Internal Processor Caches.
For the Intel486 and Pentium processors, the LOCK# signal is always asserted on the bus during a LOCK operation, even if the area of memory being locked is cached in the processor.
For the P6 and more recent processor families, if the area of memory being locked during a LOCK operation is cached in the processor that is performing the LOCK operation as write-back memory and is completely contained in a cache line, the processor may not assert the LOCK# signal on the bus. Instead, it will modify the memory location internally and allow [its] cache coherency mechanism to insure that the operation is carried out atomically. This operation is called “cache locking.” The cache coherency mechanism automatically prevents two or more processors that have the same area of memory from simultaneously modifying data in that area. (emphasis added)
Here we learn that the P6 and newer chips are smart enough to determine if they really have to block off the bus or can just rely on intelligent caching. I think this is a neat optimization.
[7] I think the “PAUSE” instruction is an interesting example of how Intel allows for backwards compatibility. Its opcode of “F3 90” makes it identical to “REP NOP” which will cause older processors to still do nothing, however newer chips use this odd opcode as a clear hint to do more efficient things.
[8] If you’re curious about where I came up with the numbers, look at this discussion on the Intel forums. It’s a bit hard to measure since context switches might skew the results. My lowest run yielded numbers that indicate a nop took 0.34 clocks per instruction and that “PAUSE” took 8.21 clocks per instruction. I did (2,400,000,000 clocks / second) * (1 PAUSE / 8.21 clocks) to get 292,326,431 PAUSEs / second or 3.42 ns / PAUSE.
[9] UPDATE: The original statement made a statement that this was 100,000 times slower. After some good discussion in the comments, I’m not going to claim specifics since it depends a lot on the machine’s workload and a thread’s working set.
It’s interesting to note that Vance’s original code gives up after only three tries of around 70ns each. The ReaderWriterLockSlim that was ultimately derived from it keeps up the fight a little longer. It does something like “Thread.SpinWait(20 * (i + 1))” which leads to a geometric back-off over time for a total of up to 10 iterations which yields the equivalent of 1100 “YieldProcessor” calls or approximately 3.76 microseconds. This means it stays in the fight 1100 / 210 or 5.2 times longer.
(See the comments for more discussion on this)
[10] It’s important to realize that processes don’t run on Windows, but threads do. Although processes provide isolation boundaries, they require a thread to execute code.
[11] The Thread.Sleep(0) call ultimately reaches the SleepEx API that has this documentation:
A[n argument value of] zero causes the thread to relinquish the remainder of its time slice to any other thread of equal priority that is ready to run. If there are no other threads of equal priority ready to run, the function returns immediately, and the thread continues execution.
It’s interesting that ReaderWriterLockSlim does a Sleep(0) for 5 times before finally doing Sleep(1) until it reaches success. I’m assuming it does the Sleep(1) in order to protect users from themselves in the event that the thread that has the lock and then goes into a state where it’s waiting on something (e.g. I/O) to occur. Lock sensitive code should not be doing this, but it doesn’t hurt to provide this forced 1 ms minimum delay. If they didn’t do this, the thread that had the lock would remain on the waiting queue while waiting for I/O and this would potentially have the thread that needs the lock to immediately be put back on the run queue without burning much CPU time.
Finally, I’m assuming that SleepEx(0) performs a software interrupt. This is like a GOTO that jumps to a well known address that that handles the scheduling/dispatching of threads in the kernel.
[12] I’m simplifying things a bit here. Threads can wait on multiple events at one time. Therefore, setting one event might still mean that a thread is waiting on other events.
As an aside, it was only while researching this post that I realized why the WaitForMultipleObjects API is so useful. By using it, you can eliminate a very costly process of putting your thread back on the ready queue and getting scheduled only to find out that it still needs to wait and thus go back on a the wait queue.
[13] While the ReaderWriterLockSlim handles things properly, the early version that Vance posted will throw an error on a simultaneous upgrade. This is technically another way to handle the upgrade problem :-).